

A practical guide to scanning, grouping, and exporting Windows event logs with a customizable color-coded HTML report
Introduction:
Managing a Windows infrastructure often involves analyzing event logs for troubleshooting and monitoring purposes. The Windows Event Viewer provides a basic interface for this task, but it can be time-consuming to filter, group, and analyze events manually. PowerShell offers a powerful way to automate event log analysis and present the results in a more organized and visually appealing manner.
In this article, we will walk through a PowerShell script that scans a Windows Event Collector server for new events over the last 24 hours, groups them by Event ID, Provider Name, Event Source, Log Name, and Level, and exports the results as a color-coded HTML report.
The PowerShell Script:
# PowerShell Script to Scan a Windows Event Collector Server for New Events Over the Last 24 Hours, Group by Event Id, ProviderName, EventSource, LogName, and Level, and Export to HTM
# By Robert McBride 3.30.2023
# Define the start time (24 hours ago)
$StartTime = (Get-Date).AddHours(-24)
# Define the remote Event Collector server
$EventCollectorServer = "SERVER-NAME-HERE"
# Define the log names to search
$LogNames = @("ForwardedEvents")
# Function to get events from a remote server
function Get-RemoteEvents {
param (
[string]$Server,
[string]$LogPath,
[datetime]$StartTime
)
$ScriptBlock = {
param($LogPath, $StartTime)
$FilterHashtable = @{
Path = $LogPath
StartTime = $StartTime
}
$Events = Get-WinEvent -FilterHashtable $FilterHashtable -ErrorAction SilentlyContinue
return $Events
}
$Events = Invoke-Command -ComputerName $Server -ScriptBlock $ScriptBlock -ArgumentList $LogPath, $StartTime
return $Events
}
# Call the function to get events from the remote server
$LogPath = "PATH-TO-LOGS"
$Events = Get-RemoteEvents -Server $EventCollectorServer -LogPath $LogPath -StartTime $StartTime
# Group events by Id, ProviderName, EventSource, LogName, and Level, and count the occurrences, find the latest timestamp
$GroupedEvents = $Events | Group-Object Id, ProviderName, MachineName, LogName, Level | Select-Object @{Name="EventId"; Expression={$_.Group[0].Id}}, @{Name="ProviderName"; Expression={$_.Group[0].ProviderName}}, @{Name="EventSource"; Expression={$_.Group[0].MachineName}}, @{Name="LogName"; Expression={$_.Group[0].LogName}}, @{Name="Level"; Expression={$_.Group[0].Level}}, @{Name="Count"; Expression={$_.Count}}, @{Name="LatestTimeStamp"; Expression={($_.Group | Measure-Object -Property TimeCreated -Maximum).Maximum}}
# Define HTML content with CSS for coloring event levels
$HtmlContent = @"
<!DOCTYPE html>
<html>
<head>
<style>
table {
width: 100%;
border-collapse: collapse;
}
th, td {
padding: 8px;
text-align: left;
font-size: 12px;
border-bottom: 1px solid #ddd;
}
th {
background-color: #f2f2f2;
}
.error {
background-color: #FAAC9B;
}
.warning {
background-color: #FAF69B;
}
.info {
background-color: white;
}
.verbose {
background-color: white;
}
.other {
background-color: gray;
}
</style>
</head>
<body>
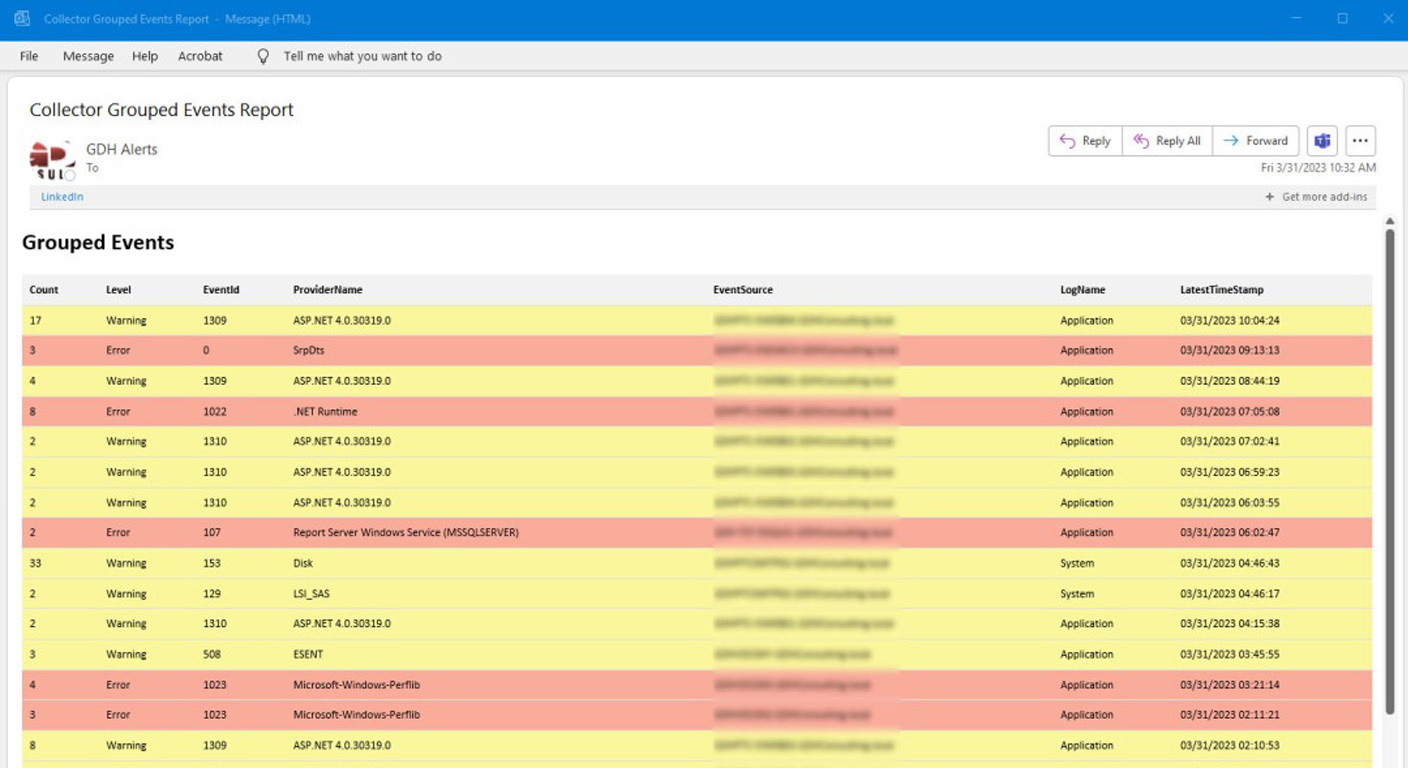
<h2>Grouped Events</h2>
<table>
<tr>
<th>Count</th>
<th>Level</th>
<th>EventId</th>
<th>ProviderName</th>
<th>EventSource</th>
<th>LogName</th>
<th>LatestTimeStamp</th>
</tr>
"@
# Append grouped events to the HTML content with color-coded event level
foreach ($GroupedEvent in $GroupedEvents) {
$LevelName = ""
switch ($GroupedEvent.Level) {
2 { $LevelName = "Error" }
3 { $LevelName = "Warning" }
4 { $LevelName = "Information" }
5 { $LevelName = "Verbose" }
default { $LevelName = "Other" }
}
switch ($LevelName) {
"Error" { $LevelClass = "error" } # Error
"Warning" { $LevelClass = "warning" } # Warning
"Information" { $LevelClass = "info" } # Information
"Verbose" { $LevelClass = "verbose" } # Verbose
default { $LevelClass = "other" }
}
$HtmlContent += @"
<tr class='$LevelClass'>
<td>$($GroupedEvent.Count)</td>
<td>$($LevelName)</td>
<td>$($GroupedEvent.EventId)</td>
<td>$($GroupedEvent.ProviderName)</td>
<td>$($GroupedEvent.EventSource)</td>
<td>$($GroupedEvent.LogName)</td>
<td>$($GroupedEvent.LatestTimeStamp)</td>
</tr>
"@
}
$HtmlContent += @"
</table>
</body>
</html>
"@
# Set your email configuration
$SmtpServer = "IP-ADDRESS-SMTP-SERVER"
$SmtpPort = 25
$From = "[email protected]"
$To = "[email protected]"
$Subject = "Collector Grouped Events Report"
# Convert the HTML content to a string
$HtmlContentString = $HtmlContent | Out-String
# Send the HTML email
Send-MailMessage -From $From -To $To -Subject $Subject -Body $HtmlContentString -BodyAsHtml -SmtpServer $SmtpServer -Port $SmtpPort How the Script Works:
- Define the start time, remote Event Collector server, and log names to search.
- Create a function to get events from the remote server using the Get-WinEvent cmdlet and an XML query.
- Call the function to get the events from the remote server.
- Group the events by Id, ProviderName, EventSource, LogName, and Level. Count the occurrences of each group and find the latest timestamp.
- Define the HTML content with CSS for coloring event levels.
- Append the grouped events to the HTML content, applying appropriate colors to the Level cell using inline styles.
- Export the results to an HTML file.
Customizing the Script:
The script can be easily customized to fit your specific needs. For example, you can modify the start time to change the time range of events to analyze, add or remove log names to search, or change the grouping criteria.
Additionally, you can customize the appearance of the HTML report by modifying the CSS styles or adding new columns to the table.
You can create a scheduled task to run the PowerShell script daily using the New-ScheduledTask, New-ScheduledTaskTrigger, New-ScheduledTaskPrincipal, New-ScheduledTaskAction, and Register-ScheduledTask cmdlets. Below is an example of how you can create a scheduled task to run the script daily at a specific time:
# Define the task setting
$TaskName = "DailyEventLogReport"
$TaskDescription = "Generate a daily Windows Event Log report using PowerShell"
$ScriptPath = "C:\path\to\your\powershell_script.ps1"
$RunTime = "07:00" # Set the time you want the task to run (e.g., 7:00 AM)

# Create a new scheduled task, trigger, principal, and action
$Task = New-ScheduledTask
$Trigger = New-ScheduledTaskTrigger -Daily -At $RunTime
$Principal = New-ScheduledTaskPrincipal -UserId "NT AUTHORITY\SYSTEM" -LogonType ServiceAccount -RunLevel Highest
$Action = New-ScheduledTaskAction -Execute "powershell.exe" -Argument "-NoProfile -WindowStyle Hidden -File $ScriptPath"

# Set the task settings
$Task.Triggers = $Trigger
$Task.Principal = $Principal
$Task.Actions = $Action
$Task.Settings.ExecutionTimeLimit = "PT0S" # No time limit

# Register the scheduled task
Register-ScheduledTask -TaskName $TaskName -InputObject $Task -Description $TaskDescriptions
This script creates a new scheduled task that runs daily at the specified time using the SYSTEM account with the highest privileges. The PowerShell script is executed without a profile and in a hidden window. Replace C:\path\to\your\powershell_script.ps1 with the actual path to the PowerShell script you want to run.
Make sure to run this script as an administrator, as creating a scheduled task requires administrative privileges.
Conclusion:
PowerShell offers a powerful and flexible way to analyze and report on Windows event logs. By automating the process and presenting the results in a visually appealing format, you can save time and make it easier to identify trends and potential issues in your Windows infrastructure.
Next time you need to analyze event logs, give this PowerShell script a try and see how it can improve your workflow. And don’t forget to share your own customizations and improvements with the community!